Google의 ARCore에 대한 자료가 아직은 많지 않네요.
AR의 기반을 제공 해 주는 유용한 기술이기도 하고, AR을 쓰지 않더라도 3D 랜더링에 대한 기반을 좀 쉽게 가져갈 수 있지 않을까 해서 한번 공부 해 보겠습니다.
ARCore 사이트 : https://developers.google.com/ar
developers.google.com
0. 리뷰 내용
arcore 사이트나 sceneform 사이트에 나오는 내용은 어느 정도 android 개발을 해 본 분들이라면 쉽게 따라 갈 수 있지 않을까 싶습니다만, (저처럼) 그렇지 않은 사람은 그런 환경 만드는 것 부터가 큰 장애물입니다. 그래서, ARCore나 Sceneform의 본래 내용과는 조금 거리가 멀더라도 android 개발 환경 구축과 관련 된 내용도 가급적 남겨 보겠습니다.
1. 프로젝트 생성
android studio를 이용해서 개발을 할텐데, 갤럭시1이 나오고 android 개발을 여기저기서 배우기 시작 할 때 살짝 맛만 봤었는데, 정말 많이 달라진 것 같네요. android studio 또한 툴로써 잘 활용하기 위해 많이 익혀야 될 대상이지만, 이렇게 다른 기술들 배우면서 익혀나가면 곧 익숙하게 되겠죠.
일단, ARCore 사용을 위한 최소 버젼은, ARCore 소개 내용에 다음과 같이 작성되어 있습니다.
Install Android Studio version 3.1 or higher with Android SDK Platform version 7.0 (API level 24) or higher.
빈 프로젝트를 만들어 봅니다.

android sdk 최소 버전 확인하고, 일반적으로 앱 만들 때 사용하는 Next, Next,... 처럼 샤샤삭~~

여기까지는 큰 문제없이 만들어지겠죠?

2. 프로젝트 설정
이제 ARCore의 3D 랜더링 부분을 담당하는 sceneform에 대한 설정을 해 보겠습니다. 아래 사이트의 내용도 참고 해 주세요.
Sceneform : https://developers.google.com/ar/develop/java/sceneform
Sceneform overview | ARCore | Google Developers
Sceneform makes it straightforward to render realistic 3D scenes in AR and non-AR apps, without having to learn OpenGL. It includes: This page explains key concepts by exploring the code in the Hello Sceneform sample app. Note: This sample uses Sceneform a
developers.google.com
개인적으로 sceneform에 기대하는 바는, OpenGL의 배경 지식이 좀 부족해도, 무거운 게임 엔진을 쓰지 않아도, 3D를 간편히 구현하고 이를 AR과 연동 할 수 있는 기반을 제공 해 주지 않을까 하는 점들 입니다.
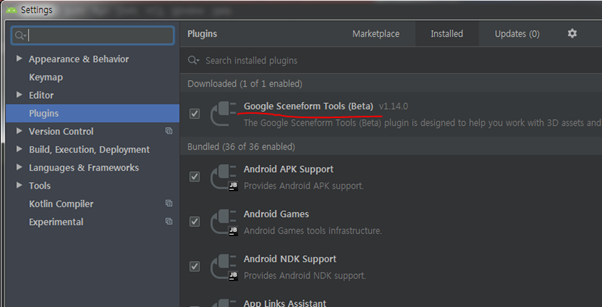
먼저, Sceneform tool이라는 android studio의 plugin을 설치합니다. 이 툴을 설치하면 3D 오브젝트 파일 몇 가지를 ARCore에서 사용하는 포멧으로 자동 변환을 해 주는 기능이 됩니다. AR을 쓰려면, 결국 끝에는 컨텐츠에 따라 그 완성도가 크게 좌우 될 것이니, 다양한 컨텐츠를 얼마나 쉽게 활용 할 수 있느냐도 매우 중요한 점입니다.
File > Settings...
다음으로, 필요한 모듈을 받을 수 있도록, Project의 build.gradle에 구글 레파지토리를 연결 해 둡니다.
사실, 이런 부분들이 저 같은(Visual studio 6 ~ 2008까지 MFC 환경에서만 주로 개발 해 온....^^) 옛날 사람들에게는 좀 생소한 부분이라 하라는데로 따라하지만, 배우고 익숙해져야 할 것들이 많은 것 같아요.

이제 사용 할 라이브러리에 ARCore를 추가합니다. App의 build.gradle에 다음과 같이 추가 합니다. OpenGL을 처음 배울 때도 Visual studio에 library 연결하는 방법이 가장 생소하고 어려웠었는데, ARCore 내용보다 이런 개발 환경의 차이가, 제때 android로 넘어가지 못한 사람에게는 큰 진입 장벽이 되는 것 같아요.

코딩을 배우면서 늘 생각 해 왔던, 제 나름의 철칙이라면 '백문이 불여일타'인데, 간단한 내용도 직접 해 봐야 빠뜨리고 체크하지 못한 것이 무엇인지 알 수 있는 것 같습니다. 위에도 오타가 있었는데, 라이브러리 추가 syntax에 대한 경험이 없으니, 무엇이 문제인지 알 수가 없었는데, 이런 경험을 통해 배워 나가게 됩니다. 요즘에는 개발 공부 할 때 처음부터 하지 말라고 하는 분들도 계신데, 최근의 환경을 보면, 그런 내용도 충분히 설득력이 있는 것 같아요.

이런 syntax 자체에 익숙하다면, 직접 타이핑 하지 않고, 그냥 복사해서 붙여넣기를 하는 것도 나쁘지 않죠. 그럴 수 있는 환경도 제공되고 있고~ 아래와 같이 sceneform 소개 내용의 코드 부분에서 우측 상단에 코드를 복사 할 수 있는 기능이 있어요.

3. androidmanifest.xml
이렇게 하고 빌드를 해 보면, 에러가 나는데, 코드 자체의 문제 보다는 구글의 정책 변경에 따른 영향입니다.

이에 대해서 잘 정리 해 두신 분이 계셔서 읽어보니, 구글의 야심이랄까, 욕심이랄까... 좀 무섭긴 합니다.
intent filter에 VIEW를 추가 해 주면 오류가 해결 됩니다.
<action android:name="android.intent.action.VIEW" />
그리고, android camera2가 지원되는 내용도 이 기술 문서에는 반영되어 있지 않은 것 같아서, 조금 염려(잘 될지..)되기도 했습니다.

정리하면~~~
<?xml version="1.0" encoding="utf-8"?>
<manifest xmlns:android="http://schemas.android.com/apk/res/android"
    package="com.wonil.arform">

    <uses-permission android:name="android.permission.CAMERA" />
    <uses-feature android:glEsVersion="0x00030000" android:required="true" />
    <uses-feature android:name="android.hardware.camera.ar" />


    <application
        android:allowBackup="true"
        android:icon="@mipmap/ic_launcher"
        android:label="@string/app_name"
        android:roundIcon="@mipmap/ic_launcher_round"
        android:supportsRtl="true"
        android:theme="@style/AppTheme">
        <activity android:name=".MainActivity">
            <intent-filter>
                <action android:name="android.intent.action.MAIN" />
                <action android:name="android.intent.action.VIEW" />
                <category android:name="android.intent.category.LAUNCHER" />
            </intent-filter>
        </activity>

        <meta-data android:name="com.google.ar.core" android:value="required" />
    </application>

</manifest>
(* 요런 코드 블럭 삽입 기능도 참 좋네요. 예전엔 이런 코드를 포스트에 넣으면 다 깨져셔 pre tag를 써서 넣고 그랬는데..^^. 너무 옛날 사람이 된 것 같네요.)
이제 실제 ARCore/ sceneform을 사용해서 프로젝트 구현을 해야 하는데, 다음 포스트해서 해 보겠습니다.
https://learn-and-give.tistory.com/3
[Sceneform]#2. 기본 코드 입력
지금까지 프로젝트의 공통적인 설정을 했다면, 이제부터는 구현하려는 프로젝트에 따라 달라질 수 있는 부분을 처리 해 보도록 하겠습니다. * android stuido의 update/ upgrade 위와 같이, android studio의
learn-and-give.tistory.com
구글에서 제공되는 Hello sceneform 예제를 참고하며 구현 할 예정인데, sceneform SDK repository 하위에 포함되어 있어요.
Sceneform android SDK repository : https://github.com/google-ar/sceneform-android-sdk
google-ar/sceneform-android-sdk
Sceneform SDK for Android. Contribute to google-ar/sceneform-android-sdk development by creating an account on GitHub.
github.com
Hello Sceneform : https://github.com/google-ar/sceneform-android-sdk/tree/master/samples/hellosceneform
google-ar/sceneform-android-sdk
Sceneform SDK for Android. Contribute to google-ar/sceneform-android-sdk development by creating an account on GitHub.
github.com
'공허의 유산 > 표현의 자유' 카테고리의 다른 글
| [opengl].[#1.Setup] Windows/VS2019/glut 기반의 셋업(2) - glut(freeglut)로 opengl 창 띄우기 (0) | 2020.08.08 |
|---|---|
| [opengl].[#1.Setup] Windows/VS2019/glut 기반의 셋업(1) - Visual studio 2019 설치 (0) | 2020.08.08 |
| [sceneform]#4. augmented face review (0) | 2020.03.02 |
| [sceneform]#3. model 변경하기 (0) | 2020.01.18 |
| [Sceneform]#2. 기본 코드 입력 (0) | 2020.01.13 |


댓글