앞에서 Firebase에서 제공하는 DB인 Cloud Firestore에 메세지 데이터를 저장하고 읽어와서 기본적인 채팅 기능을 구현하였습니다.
https://learn-and-give.tistory.com/106
[Firebase Codelab 샘플] 04. Cloud Firestore에 메세지 쓰기
앞에서 Firebase SDK를 활용하여 로컬에서 개발 할 환경을 만들었습니다. 꽤 많은 일들을 했죠. https://learn-and-give.tistory.com/105 [Firebase Codelab 샘플] 03. Firebase SDK 설치와 CLI 기반 개발환경 구성 앞에서,
learn-and-give.tistory.com
이번에는 채팅 할 때 이미지 파일을 채팅에 올려서 공유하는 기능을 이미지 파일 저장/받기 기능을 이용하여 만들어 보겠습니다.
https://firebase.google.com/codelabs/firebase-web?authuser=0&hl=ko#9
Firebase 웹 코드랩
이 코드랩에서는 채팅 앱을 빌드하여 웹에서 Firebase 플랫폼을 사용하는 방법을 배웁니다.
firebase.google.com
Cloud Firestore는 DB이고, Cloud Storage는 파일을 저장하는 서비스 입니다.
https://firebase.google.com/docs/storage/?authuser=0&hl=ko
Firebase용 Cloud Storage
Firebase용 Cloud Storage는 사진, 동영상 등의 사용자 제작 콘텐츠를 저장하고 제공해야 하는 앱 개발자를 위해 만들어졌습니다.
firebase.google.com
이미지 파일을 전송하기 위한 기반 코드의 작성도 초보에게는 그리 간단한 내용이 아닌데, 일단 이 예제의 HTML 관련 된 코드는 이미 다 작성되어 있으니, 전달 된 이미지 파일을 Cloud Storage에 올리는 것만 확인 해 보겠습니다.
작성 할 코드는 이미지 업로드 중 대기 화면이 표시되는데, 이 대기 화면도 하나의 메세지로써 구현 됩니다. (#1) 즉, 대기 화면이 보여지는 메세지를 보여주면서 업로드가 진행 되는 것이죠.(#2) 이 때 업로드 되는 파일은 지정 된 규칙의 경로에 파일을 올립니다. 그 후, 등록 된 URL을 받아(#3) 해당 이미지를 대기 화면으로 보여지던 채팅 메세지의 내용으로 업데이트 하여 내용을 갱신합니다.(#4) 그렇게 하면, 앞의 예제 처럼 등록 된 메세지의 가시화가 진행 됩니다.
...
일단, 이 내용은 간단하죠?
코드를 살펴보겠습니다.
// Saves a new message containing an image in Firebase.
// This first saves the image in Firebase storage.
async function saveImageMessage(file) {
  try {
    // 1 - We add a message with a loading icon that will get updated with the shared image.
    const messageRef = await addDoc(collection(getFirestore(), 'messages'), {
      name: getUserName(),
      imageUrl: LOADING_IMAGE_URL,
      profilePicUrl: getProfilePicUrl(),
      timestamp: serverTimestamp()
    });

    // 2 - Upload the image to Cloud Storage.
    const filePath = `${getAuth().currentUser.uid}/${messageRef.id}/${file.name}`;
    const newImageRef = ref(getStorage(), filePath);
    const fileSnapshot = await uploadBytesResumable(newImageRef, file);

    // 3 - Generate a public URL for the file.
    const publicImageUrl = await getDownloadURL(newImageRef);

    // 4 - Update the chat message placeholder with the image's URL.
    await updateDoc(messageRef,{
      imageUrl: publicImageUrl,
      storageUri: fileSnapshot.metadata.fullPath
    });
  } catch (error) {
    console.error('There was an error uploading a file to Cloud Storage:', error);
  }
}
결과는…
허무하게도 너무 쉽게 됩니다. 이미 작성되어 있던 코드가 그만큼 많다는 것이죠.

알림
알림 처리를 해보겠습니다. 알림은 알림을 받을 디바이스를 Firebase에 등록하는 것으로부터 시작합니다. 아, 물론 권한의 획득이 우선 되어야 합니다. 알림 화면은 웹 페이지를 돌아다니다보면 종종 볼 수 있죠. 예제를 처음 실행하면 권한 획득창이 뜨게 되는데, 이런 팝업이 바로 알림을 위한 권한을 얻는 과정입니다.

이런 처리를 위해서는 필요한 파일들을 import 해야 합니다.
// Import and configure the Firebase SDK
import { initializeApp } from 'firebase/app';
import { getMessaging } from 'firebase/messaging/sw';
import { getFirebaseConfig } from './firebase-config';

const firebaseApp = initializeApp(getFirebaseConfig());
getMessaging(firebaseApp);
console.info('Firebase messaging service worker is set up');
FCM(Firebase Cloud Messaging)을 이용한 알림.
알림을 보낼 대상, 즉 목표 디바이스의 식별 정보가 필요한데, 이것을 FCM 토큰이라고 합니다.
코드를 보면 더 쉽게 이해가 됩니다.
// Saves the messaging device token to Cloud Firestore.
async function saveMessagingDeviceToken() {
  try {
    const currentToken = await getToken(getMessaging());
    if (currentToken) {
      console.log('Got FCM device token:', currentToken);
      // Saving the Device Token to Cloud Firestore.
      const tokenRef = doc(getFirestore(), 'fcmTokens', currentToken);
      await setDoc(tokenRef, { uid: getAuth().currentUser.uid });

      // This will fire when a message is received while the app is in the foreground.
      // When the app is in the background, firebase-messaging-sw.js will receive the message instead.
      onMessage(getMessaging(), (message) => {
        console.log(
          'New foreground notification from Firebase Messaging!',
          message.notification
        );
      });
    } else {
      // Need to request permissions to show notifications.
      requestNotificationsPermissions();
    }
  } catch(error) {
    console.error('Unable to get messaging token.', error);
  };
}
코드를 보면, FCM 토큰이 있으면 fcmTokens라는 컬렉션에 토큰값을 저장하고, 알림이 오면 실행 할 함수(여기서는 알림 메세지를 콘솔에 출력)도 등록합니다. 만약, 토큰이 없다면 권한을 얻지 못한 것이므로 권한 요청 창을 띄우게 됩니다. 코드를 이해하는 것은 그다지 복잡하지 않네요. 직접 작성하라고 하면 어렵겠지만~
권한 요청 팝업 또한 전부 자동으로 되는 것은 아니고, 약간의 코드 작성이 필요 합니다. 뭐 달리 설명이 필요 없을 정도로 간단하기는 하지만 말이죠.
// Requests permissions to show notifications.
async function requestNotificationsPermissions() {
  console.log('Requesting notifications permission...');
  const permission = await Notification.requestPermission();

  if (permission === 'granted') {
    console.log('Notification permission granted.');
    // Notification permission granted.
    await saveMessagingDeviceToken();
  } else {
    console.log('Unable to get permission to notify.');
  }
}
실행
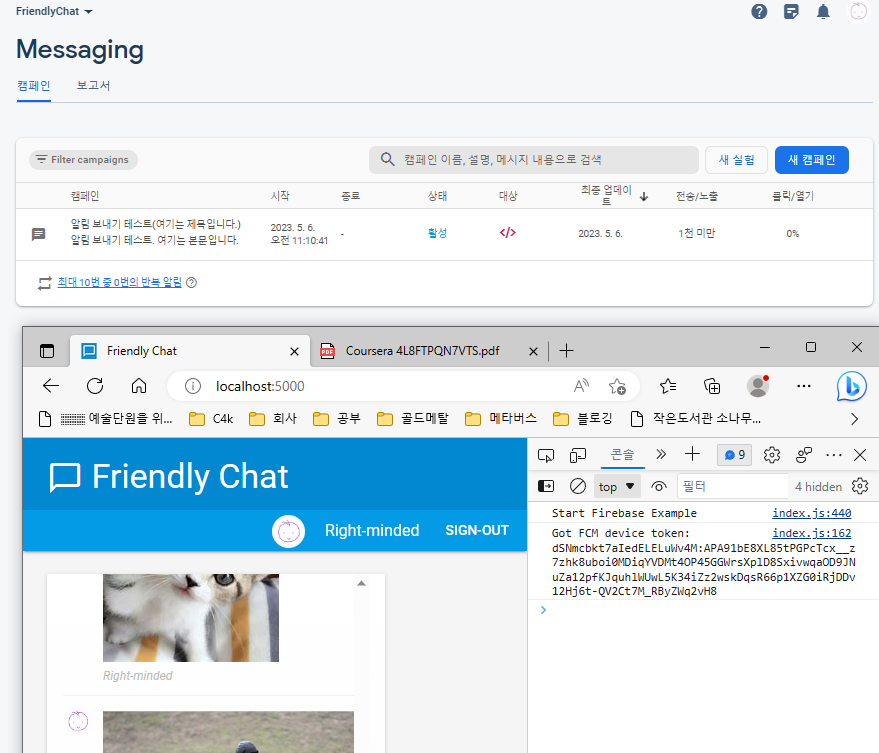
권한 승인을 한 상태에서 실행을 시켜보면 FCM 토큰을 볼 수 있습니다. 이렇게 확인 된 토큰을 이용하여 Firebase console에서 알림을 보낼 수 있는데, 일단 값을 잘 기억 해 두도록 합니다.

푸시 알림 보내기
푸시 알림을 직접 한번 보내보겠습니다.
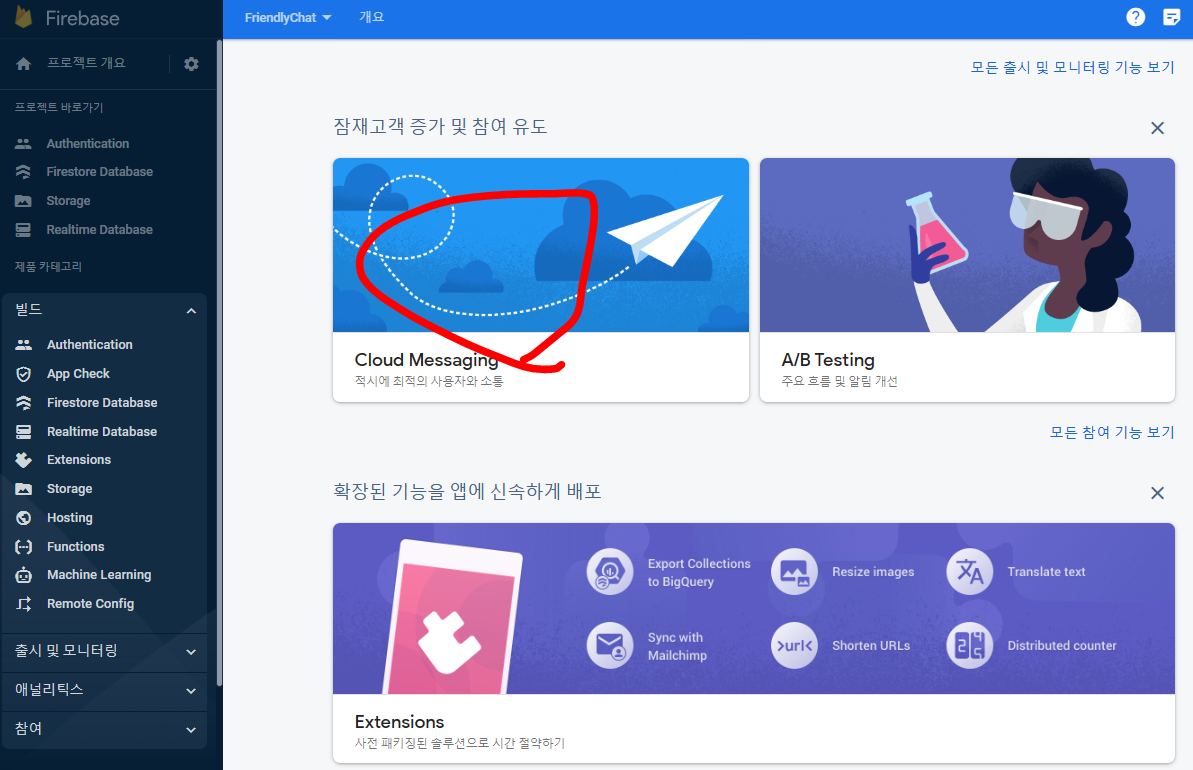
콘솔로 가서 메세징을 실행합니다.


자, 이제 아래 화면부터가 중요합니다.
왼쪽의 입력창은 수신자를 따로 지정하지 않고 전체에 보내는 것입니다. 그래서, 따로 토큰을 지정하는 곳이 없습니다.


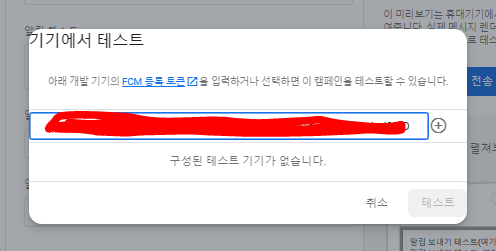
Codelab 문서에서는 오른쪽의 테스트 기능을 가지고 설명을 해주는데요, 여기는 토큰을 설정하는 화면이 나옵니다. 잘 기억해둡시다. 일단 전체 보내기를 끝까지 고고씽.

게시를 누르면 잠시 처리를 하고 게시 처리가 되는데, 열려있는 페이지에 적용 되지는 않는 것 같네요. 콘솔 로그에 아무것도 보이지 않네요.

테스트로 해보려고 하니, FCM 입력 화면이 바로 나옵니다.

그런데, 이 와중에 크롬 콘솔에서 알림이 확인 된 로그가 보입니다.
구현한 방법에는 특별한 문제가 업었던 것을 확인했네요.

크롬 뿐만 아니라 엣지도 그렇고.. 좀 지연이 있네요.

다시, 테스트 전송 화면으로 돌아와, 두 개 브라우져의 FCM을 각각 등록 해 둡니다.

테스트 보내기에서 보내보면, 거의 실시간이라고 해도 될만큼 금방 왔습니다.

언제 FCM을 발송할 것인지, FCM을 받아서 어떤 처리를 할 것인지 등등~~ 그것은 작성자의 몫~~~
다음 시간에는 DB나 Storage 접근 권한에 대해서 알아보겠습니다.
https://learn-and-give.tistory.com/108
[Firebase Codelab 샘플] 06. 접근 권한 설정
앞에서는 텍스트 채팅에 더하여 이미지를 대화에 올리기 위해 파일을 Cloud Storage에 올려 사용하는 방법을 살펴 보았고, 알림 메세지를 보내기 위해 FCM을 이용하는 방법을 알아보았습니다. https://
learn-and-give.tistory.com
'공허의 유산 > 사상의 도구' 카테고리의 다른 글
| [MDN/Express] 01.Express 웹 프레임워크 (Node.js/JavaScript의 활용) (0) | 2023.05.27 |
|---|---|
| [Firebase Codelab 샘플] 06. 접근 권한 설정 (1) | 2023.05.09 |
| [Firebase Codelab 샘플] 04. Cloud Firestore에 메세지 쓰기 (0) | 2023.05.07 |
| [Firebase Codelab 샘플] 03. Firebase SDK 설치와 CLI 기반 개발환경 구성 (0) | 2023.05.06 |
| [Firebase Codelab 샘플] 02.구글 로그인과 Cloud Firestore(DB), Cloud Storage 사용 (0) | 2023.05.06 |


댓글