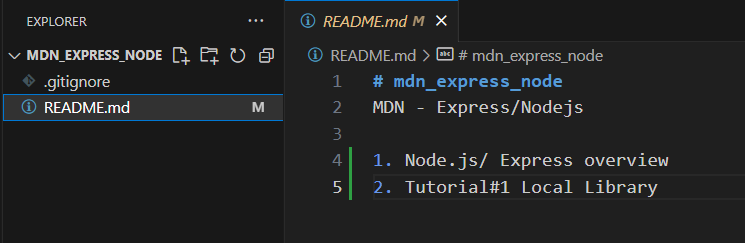
앞에서 Node.js의 기초적인 내용과 Express 모듈을 이용하여 간단한 웹서버 구축을 살펴보았습니다.
https://learn-and-give.tistory.com/113
[MDN/Express] 01.Express 웹 프레임워크 (Node.js/JavaScript의 활용)
뭘 좀 만들어 보려고 하면 결국 서버쪽 개발에서 어려움을 겪었는데, node.js로 가볍게 한번 다시 도전! 오래 된 기술이라서 여기저기 자료가 많아서 좋기는 한데 너무 많아서 어디부터 시작해야
learn-and-give.tistory.com
MDN의 Express tutorial 첫번째는, 로컬 라이브러리 웹사이트입니다. 제목만 봐서는 정확히 무슨 내용인지 모르겠네요.
Express Tutorial: The Local Library website - Learn web development | MDN
Now that you know a bit more about the LocalLibrary website and what you're going to learn, it's time to start creating a skeleton project to contain our example.
developer.mozilla.org
내용을 좀 살펴보니, 프로그래밍과 관련 된 '라이브러리'가 아니고, 동네 도서관이라는 뜻이네요. 목록을 조회하여 보여주는 그런 데이터 입출력 예제인 것 같습니다. DB를 사용하는 방법도 배우고 라이팅과 view를 만들어 랜더링 하는 법도 다룹니다. 꽤 중요한 내용이 많은 것 같네요. 하다가 막히는 사람들을 위해서 소스 코드를 github에 올려두었네요.
https://github.com/mdn/express-locallibrary-tutorial
GitHub - mdn/express-locallibrary-tutorial: Local Library website written in NodeJS/Express; example for the MDN server-side dev
Local Library website written in NodeJS/Express; example for the MDN server-side development NodeJS module: https://developer.mozilla.org/en-US/docs/Learn/Server-side/Express_Nodejs. - GitHub - mdn...
github.com
Express Tutorial Part 2: Creating a skeleton website
도서관 홈페이지의 뼈대를 구성 해 보겠습니다.
https://developer.mozilla.org/en-US/docs/Learn/Server-side/Express_Nodejs/skeleton_website
Express Tutorial Part 2: Creating a skeleton website - Learn web development | MDN
You have now created a skeleton website project for the Local Library and verified that it runs using node. Most importantly, you also understand how the project is structured, so you have a good idea where we need to make changes to add routes and views f
developer.mozilla.org
첫번째 리뷰 때 봤던 Express Application Generator를 이용해서 프로젝트 초기 구조를 만듭니다. 그러니, EAG가 설치되어 있어야 하겠죠? 설치는 앞에서 했으니 넘어가고~ 프로젝트 초기화를 하는 여러가지 방법이 있네요. 사용 할 모듈을 지정 할 수도 있습니다.
뷰 엔진도 여러 종류를 지원하는데 특별히 지정하지 않으면 Jade가 사용됩니다. 랜더링 엔진을 결정 할 때 고려 할 사항에 대해서도 정리가 되어 있는데, 일단 여기 정리 되어 있다는 것만 체크 하고 넘어가겠습니다. 왜냐하면, 지금은 무슨 말인지 잘 모르니~~~
CSS stylesheet 엔진도 뷰 엔진처럼 선택 할 수 있고, DB도 선택 할 수 있고....
가용한 옵션을 보려면 help를 실행 시켜서 확인 할 수 있습니다.
C:\Study\mdn_express_node>express --help

  Usage: express [options] [dir]

  Options:

        --version        output the version number
    -e, --ejs            add ejs engine support
        --pug            add pug engine support
        --hbs            add handlebars engine support
    -H, --hogan          add hogan.js engine support
    -v, --view <engine>  add view <engine> support (dust|ejs|hbs|hjs|jade|pug|twig|vash) (defaults to jade)
        --no-view        use static html instead of view engine
    -c, --css <engine>   add stylesheet <engine> support (less|stylus|compass|sass) (defaults to plain css)
        --git            add .gitignore
    -f, --force          force on non-empty directory
    -h, --help           output usage information

C:\Study\mdn_express_node>
프로젝트 생성
이전 코드에서 계속 발전 시켜 가는 단계는 아직 아니므로, 전에 작성한 내용은 다 지웁니다.
따로 폴더를 만들어서 하셔도 되고... 저는 다 삭제하고 git 관련 파일만 남겨뒀습니다.
이제 실제로 생성기를 이용해서 프로젝트를 만들어 보겠습니다. tutorial에 나와있는 프로젝트 이름을 그대로 따라하겠습니다.
C:\Study\mdn_express_node>express express-locallibrary-tutorial --view=pug

   create : express-locallibrary-tutorial\
   create : express-locallibrary-tutorial\public\
   create : express-locallibrary-tutorial\public\javascripts\
   create : express-locallibrary-tutorial\public\images\
   create : express-locallibrary-tutorial\public\stylesheets\
   create : express-locallibrary-tutorial\public\stylesheets\style.css
   create : express-locallibrary-tutorial\routes\
   create : express-locallibrary-tutorial\routes\index.js
   create : express-locallibrary-tutorial\routes\users.js
   create : express-locallibrary-tutorial\views\
   create : express-locallibrary-tutorial\views\error.pug
   create : express-locallibrary-tutorial\views\index.pug
   create : express-locallibrary-tutorial\views\layout.pug
   create : express-locallibrary-tutorial\app.js
   create : express-locallibrary-tutorial\package.json
   create : express-locallibrary-tutorial\bin\
   create : express-locallibrary-tutorial\bin\www

   change directory:
     > cd express-locallibrary-tutorial

   install dependencies:
     > npm install

   run the app:
     > SET DEBUG=express-locallibrary-tutorial:* & npm start


C:\Study\mdn_express_node>
출력 된 내용을 보니 다음에 무엇을 해야 할지도 잘 정리해서 보여주고 있네요. 프로젝트 폴더 내부로 가서 dependency 설치를 한 후 실행하라고 되어 있네요.
결과는 아래와 같이 만들어졌습니다.

이제 생성 된 프로젝트 폴더 내로 이동하여 필요한 모듈 설치를 합니다.
C:\Study\mdn_express_node>cd express-locallibrary-tutorial

C:\Study\mdn_express_node\express-locallibrary-tutorial>npm install
npm WARN deprecated core-js@2.6.12: core-js@<3.23.3 is no longer maintained and
not recommended for usage due to the number of issues. Because of the V8 engine
whims, feature detection in old core-js versions could cause a slowdown up to 100x even if nothing is polyfilled. Some versions have web compatibility issues. Please, upgrade your dependencies to the actual version of core-js.

added 125 packages, and audited 126 packages in 10s

9 packages are looking for funding
  run `npm fund` for details

7 vulnerabilities (2 low, 5 high)

To address issues that do not require attention, run:
  npm audit fix

To address all issues, run:
  npm audit fix --force

Run `npm audit` for details.

C:\Study\mdn_express_node\express-locallibrary-tutorial>
이제 아래 명령을 실행하여 서버를 한번 띄워봅니다.
저는 윈도우즈에서 하고 있으니 아래 명령으로~
SET DEBUG=express-locallibrary-tutorial:* & npm start
특별히 설정한 것이 없으니, 앞에서 살펴 본 샘플과 같은 화면이 뜹니다.

Enable server restart on file changes
Express Tutorial Part 2: Creating a skeleton website - Learn web development | MDN
You have now created a skeleton website project for the Local Library and verified that it runs using node. Most importantly, you also understand how the project is structured, so you have a good idea where we need to make changes to add routes and views f
developer.mozilla.org
서버 개발을 하다보면 코드 수정 후 서버를 껐다가 재구동 해야 변경 사항이 적용 되는 경우가 많아서, 재구동 절차가 번거로운 경우가 많습니다 .이런 불편함을 덜어주는 툴이 있는데, 여기서는 nodemon이라는 툴을 소개 해 주고 있습니다. (오튜 강좌에도 같은 목적의 뭔가 있었는데 같은 것인지는 모르겠네요. 달랐던 것 같기도...)
https://github.com/remy/nodemon
GitHub - remy/nodemon: Monitor for any changes in your node.js application and automatically restart the server - perfect for de
Monitor for any changes in your node.js application and automatically restart the server - perfect for development - GitHub - remy/nodemon: Monitor for any changes in your node.js application and a...
github.com
이 툴은 꼭 global로 설치 할 필요는 없으니 알아서 적당히~~
그런데 이 툴은 개발을 할 때 코드를 수정하고 재구동 할 때 쓰는 것이라 개발 할 때만 필요하고, 서비스 할 때는 필요한 툴이 아닙니다. 그래서, 서비스용 모듈과 개발용 모듈을 구별 할 수 있게 되어 있습니다. 아래는 개발용 모듈로써 nodemon을 등록하는 명령입니다.
npm install --save-dev nodemon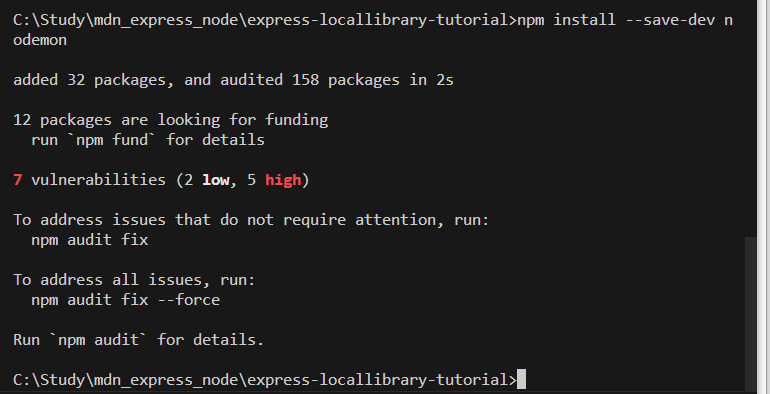
등록 된 결과도, 아래 그림과 같이 구분되어 보여집니다.
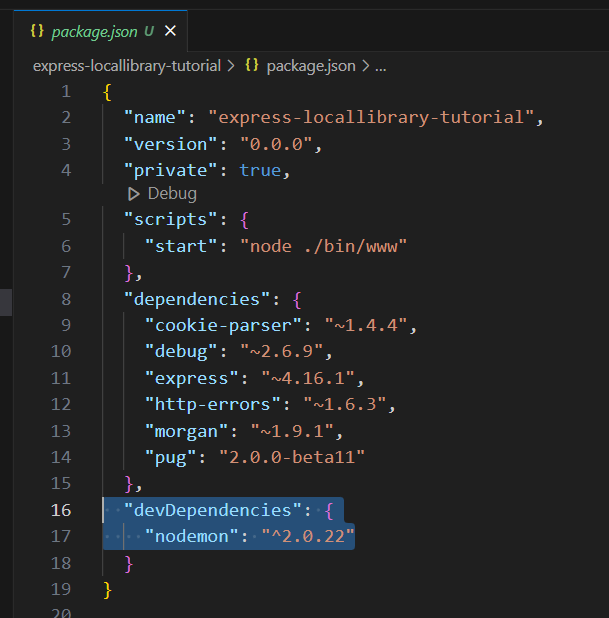
이제 개발 환경에서는 구동 될 때 요걸 실행 시켜줘서 변경이 바로 반영 되도록 해줘야 하는데, 이것은 앞에서 skip한 script 관련 내용에 포함됩니다.
바로 위의 그림으로 첨부한 package.json의 내용 중, scripts 관련 내용을 보면, 지금은 start 뿐입니다. 저것을 devstart, serverstart를 추가하도록 합니다.
가장 마지막 행은 OS에 따라 내용이 달라지는데, 저는 윈도우즈라서 아래와 같이 하였습니다. nodenom을 실행하려면 devstart를 쓰면 되겠습니다.
  "scripts": {
    "start": "node ./bin/www",
    "devstart": "nodemon ./bin/www",
    "serverstart": "SET DEBUG=express-locallibrary-tutorial:* & npm run devstart"
  },
일단, 여기까지 하고, 다음에는 자동 생성 된 프로젝트의 구조를 살펴보고, 웹 서비스를 위한 사항들을 자세히 알아보겠습니다.
https://learn-and-give.tistory.com/115
[MDN/Express] 03.Express Tutorial: The Local Library website(2)
앞에서 동네 도서관 프로젝트를 위한 기본 코드 생성까지 살펴보았습니다. https://learn-and-give.tistory.com/114#comment13660711 [MDN/Express] 02.Express Tutorial: The Local Library website(1) 앞에서 Node.js의 기초적인 내
learn-and-give.tistory.com
'공허의 유산 > 사상의 도구' 카테고리의 다른 글
| [MDN/Express] 04.Express Tutorial Part 3: Using a Database (with Mongoose) (1) (0) | 2023.06.01 |
|---|---|
| [MDN/Express] 03.Express Tutorial: The Local Library website(2) (0) | 2023.05.28 |
| [MDN/Express] 01.Express 웹 프레임워크 (Node.js/JavaScript의 활용) (0) | 2023.05.27 |
| [Firebase Codelab 샘플] 06. 접근 권한 설정 (1) | 2023.05.09 |
| [Firebase Codelab 샘플] 05. 이미지 메세지와 알림 보내기 (0) | 2023.05.08 |


댓글